Arduino Bluetooth controller can connect a mobile phone with any hardware. Although it may sound complicated, it’s actually quite easy.
Don’t worry if you have no experience in programming microcontrollers. In this post, I will show you how to create simple Bluetooth communication between our Android phone and Arduino.
Arduino is an open-source electronics platform based on easy-to-use hardware and software. This is absolutely for everyone who would like to build their own creative toys involving hard electronics and software skills.
Professionals would say that this is good for early prototypes.
Arduino Bluetooth controller advantages
- Community, which willingly shares their knowledge and complete projects on the web, so it is easy for us to start.
- Unlike most previous programmable circuit boards, the Arduino does not need a separate piece of hardware (called a programmer) in order to load new code onto the board – you can simply use a USB cable.
- Additionally, Arduino IDE uses a simplified version of C++, making it easier to learn how to program.
- Many programmers give up their interests in microcontrollers due to fear of electronics. At the beginning, electronics is not a big deal. The Arduino community likes to share their projects on the web. They also share simplified electronic schematics like in the picture below. To find schematics like this, you only need to tap in the name of the sensor or module plus Arduino and then go to Google Graphics, and the proper schema should be there. If you would like to develop more complicated devices and create your own printed circuits (PCB), then you should dig into electronics.
In my opinion, Arduino will be the best choice to start programming microcontrollers.
What is Bluetooth?
An interesting part of Bluetooth is its name. It derives from the nickname of the Viking, Danish king Harald Blatand. The English translation of Blåtand is – you guessed it – Bluetooth. Around 970, he was able to unite the fighting Danish and Norwegian tribes in a non-violent way. Similarly, Bluetooth technology has united technologies that differ from each other significantly.
Bluetooth is the standard for short-range, wireless communication between various electronic devices such as mobile phones, tablets, PC, headphones and even pressure cookers, which allow for adjusting the cooking timer and temperature through an app via Bluetooth.
Arduino part
Let’s get into the code. But first, I have a small question for you. What do you think?
How many lines of code are needed to send a text every second via Bluetooth?
Let the text be SoftwareHut. Just shoot some numbers.
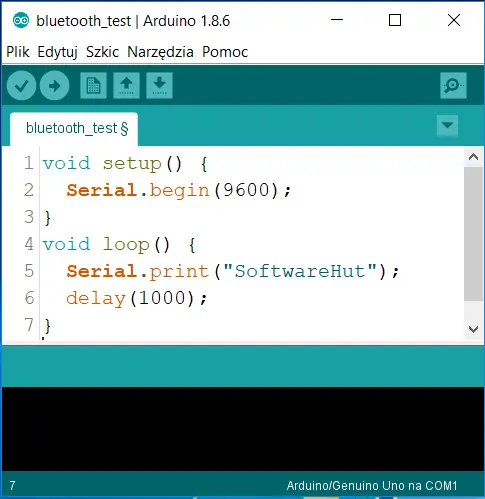
That’s it… All we need is seven lines of code! Notice that I do not even use any external libraries.
All of the magic is hidden in the hardware. From the perspective of code, sending anything wirelessly is exactly the same as sending data by wire.
The only difference is that, in the first option, we plug the Bluetooth module into the proper pins in Arduino, and in the second we don’t.
Arduino code syntax
This is a good occasion to briefly explain Arduino’s code syntax.
As you can see, we have two main methods here. First setup(): in this method, we initialize serial transmission at baud rate 9600. Baud rate is the maximum number of chars that we can send in one second. The higher the baud rate, the more sensitive the transmission becomes to noise. We set it to that specific number because our HC-06 Bluetooth module is configured to that number by default.
The only thing that is important from the start is that we should set the same baud rate on Arduino and on the Bluetooth module’s side.
The second method, loop(), is an infinite loop of a program. So here we use the serial transmission to send text SoftwareHut and add a one second delay. And that’s it! Nothing more. For me personally, it’s like magic. You can achieve such a great thing like the wireless transmission with almost no effort.
Receiving data
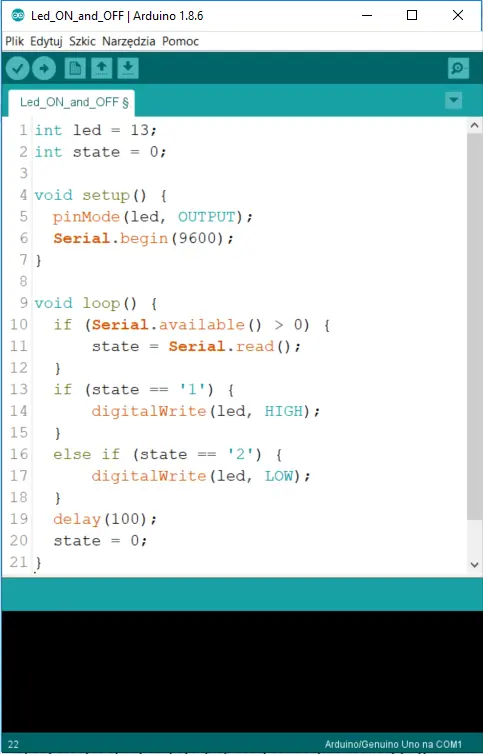
Receiving data is also not complicated. Here, we just have a Hello World that is a little more advanced. In microcontrollers, Hello World is just an LED blinking. Here, we will change the state of a LED according to the Bluetooth data received.
Let’s get back to the setup() method, we set pin 13 as an output because we would like to steer this LED not get information from it. Its Arduino’s onboard led. Of course, we also initialize serial transmission here.
In the loop method, we check if we received any data via serial. We can assitn this to a variable, if the result is ‘yes’. If we receive 1, then we change the state of the LED to high so it will light up. If we receive 2 then we change the state of the LED to LOW so it will go out.
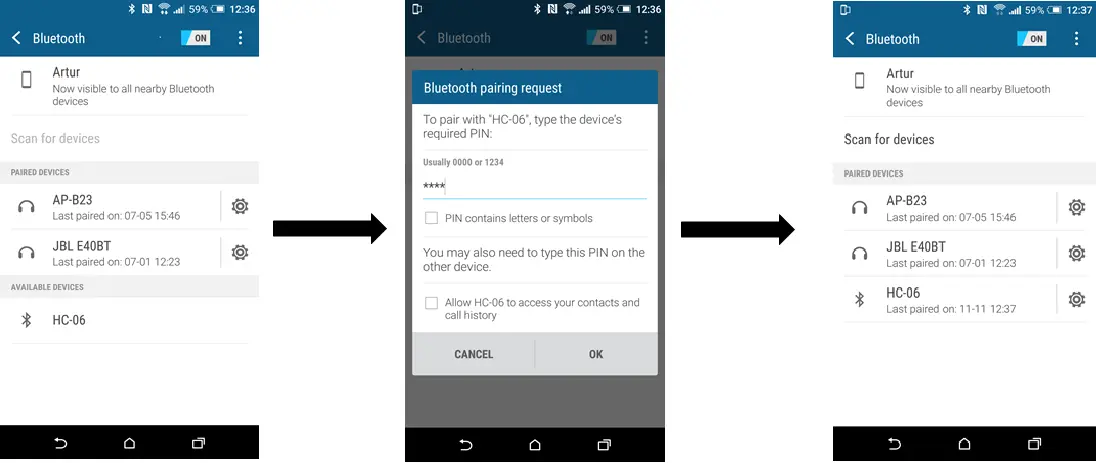
Pairing devices
To establish Bluetooth communication between two devices, we need to pair them. Device pairing is needed only once. The process looks like this:
One device must enable Bluetooth discoverability (HC-06 enables discoverability implicitly when it powers up). So this device will be visible to its surroundings.
Afterwards, we choose the option to scan for other devices on the second device. When we detect the Bluetooth module, we can send a pairing request to this module. Next, we get a pop-up dialog window on our smartphone, and here we must type the password. Naturally, its 1234, and on the HC-06, we can change it via AT commands. Then, if the password is correct, we will see that our Bluetooth device is in the paired devices section.
Android part
Now we smoothly move on to the Android part.
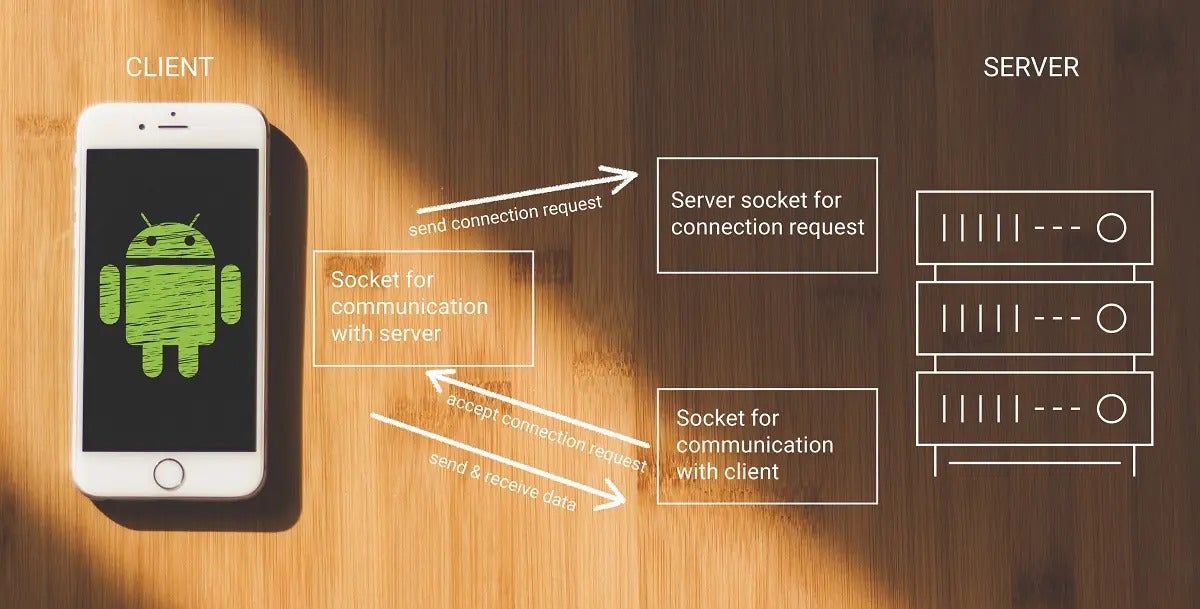
Establishing a connection is based on the client-server model. The server creates a server socket which waits for incoming connection requests, then the client creates a client socket which sends a connection request to the server.
The server accepts this request and generates a second socket which is used to communicate with this client. Now it is possible for us to send and receive data both ways.
1. Set permissions
Let’s begin with an example of the Android code. First, we should set the permissions in the AndroidManifest file. BluetoothAdmin and Bluetooth are needed.
2. Check Bluetooth’s availability
Then, we begin checking Bluetooth’s state, and to do so, we use the BluetoothAdapter class. It represents the phone’s built-in Bluetooth module. We will use this class to check if our device even has Bluetooth to begin with.
If not, sorry, we can’t do much here, so we just can finish our Activity. But we rather expect that we have Bluetooth onboard, so then we can check if this Bluetooth is enabled. If not, we can call up the system’s dialog window asking the user if they would like to turn Bluetooth on.
3. Display the list of paired devices
All right, we have checked Bluetooth’s availability, we have it turned on, so now we can display the list of paired devices. For this purpose, we use the getBondedDevices method. Then you can just add each bonded device to the list and display the most useful data, like name and MAC address.
If we don’t have any paired devices, then we display a short message to inform the user.
When the user clicks an item on the list, we then acquire a MAC address from this device. Then we send it via intent to the next screen and start our second Activity. If you would like to connect with only one device, then you can skip the part about getting the list of bonded devices. The main purpose was to get the MAC address identifying our Bluetooth device.
We are on the second screen.
We collect the MAC address that was previously sent.
Recommended reading:Best Practices for Android Developers
Establishing a connection in a new thread
Now we will try to establish a connection in a new thread. It’s important to note that some Bluetooth operations like accept, connect, read and write are mutually exclusive. Therefore, some code should be placed in a separate thread, not in the UI thread itself, to avoid freezing of the graphical user interface.
For this purpose, we will use AsyncTask. It has 3 methods that characterize it:
- onPreExecute,
- doInBackground
- and onPostExecute.
1. onPreExecute
Let’s start with onPreExecute. Here, we will show the progress dialogue windows to indicate to the user that some processes are now happening.
From my own experience with establishing Bluetooth connections, this takes about 5-10 seconds, so it is definitely worth it.
2. doInBackground
Something bigger happens in the doInBackground method. At first, we will check if the connection isn’t already established. If not, we will catch both our Bluetooth modules by representing their classes:
- BluetoothAdapter class which represents the Bluetooth module inside our phone
- BluetoothDevice which represents the device with which we would like to establish a connection.
To identify external devices, we use the MAC address collected beforehand. The next step is to create a client socket which will be connected to this device through this long method here -> createInsecureRfcommSocketToServiceRecord. UUID identifies the socket.
Now, we try to establish a Bluetooth connection through the created Socket. UUID means universal unique identifier. So here you have a short part of the Android Documentation. The recommended UUID that I used is shown here. If you would like to use another UUID, you can just generate it.
3. onPostExecute
The last, but not least, the method of AsyncTask is onPostExecute.
Here, we can hide our progress dialogue window and then check if we have established a Bluetooth connection. Depending on the result, we display the proper message to the user.

Sending data
Now we have established a Bluetooth connection. So we can send some data. For this purpose, we use getInputStream and use the write method. As you may remember, in Arduino code we set up, the LED is turned off when 2 is received. So that’s why we’re sending 2. If you would like to receive data, then you should use the analogous getInputStream method.
Close connection socket
Last thing. To avoid memory leaks, we should close our connection socket when we leave the screen with the onPause method
That’s it. Now you have the fundamentals. What exactly you will send via Bluetooth is really up to you. You can write the code that I presented here and maybe add some sensors, like a temperature sensor, and you will make a small weather station. Imagination is your only barrier.
Read more tech stories and tutorials like this on our blog!